individual pumpkin pie pots

So, you love a good pumpkin pie; however, you’re not a big fan of that soggy crust. I hate it when that happens. With this recipe you get all that wonderful pumpkin pie filling, and a nice top crust. Or, you can skip the crust altogether and just dig into that yummy filling. This is an easy peasy recipe that produces great taste and wonderful presentation. So, you ready… Let’s get into the kitchen.
prep time
10 Min
cook time
50 Min
method
Bake
yield
6 serving(s)
Ingredients
- PLAN/PURCHASE
- 10 ounces pumpkin puree (freshly made, if at all possible)
- 1/2 cup fresh clover honey
- 2 large farm fresh eggs
- 1 cup half & half
- 1 teaspoon vanilla extract
- 1/4 teaspoon salt, kosher variety
- 1/2 teaspoon freshly ground nutmeg
- 3/4 teaspoon ground cinnamon
- 1/4 teaspoon ground ginger
- homemade pastry top, or store bought
How To Make individual pumpkin pie pots
-
 Step 1PREP/PREPARE
 -
Step 2Mise en place: Gather your ingredients.
-
Step 3Place a rack in the middle position, and preheat the oven to 350 (180c).
-
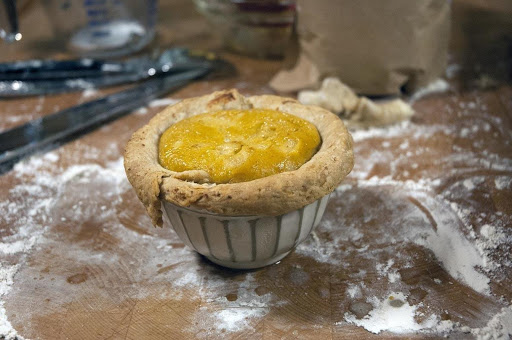
Step 4Brush some butter into the oven-proof dishes.
-
Step 5Chef’s Note: The ramekins that I’m using are 3.5 inches (9cm) in diameter by 2 inches (5cm) tall.
-
Step 6Add all of the ingredients (except the pastry top) into a large bow.
-
Step 7Whisk until just combined.
-
Step 8Chef's Tip: Whisk to combine, but not to introduce a lot of air... it doesn't need to be foamy... just combined.
-
Step 9Chef's Note: The filling can be made a day ahead, if kept covered in the refrigerator.
-
Step 10If at all possible, purchase whole nutmegs, and grind your own on a microplane. The difference between freshly ground, and bottled is amazing.
-
Step 11OPTIONAL PASTRY CRUST
-
Step 12Cut the dough into a rough shape.
-
Step 13Chef’s Note: You can buy a store-bought pastry crust, but I prefer to make a batch of Pâte Brisée. All good chefs should keep a batch of this versatile dough on hand in the freezer… especially during the holiday season.
-
Step 14Cut into strips that go about halfway down the ovenproof dish, and then lap over the sides.
-
Step 15Chef’s Tip: If you cut the dough round to fit the dish, it will look nice and elegant on your dinner table. If you cut the dough like we’re doing, and drape it over the sides of the dish, it will have a more rustic appearance. I’m currently in a rustic phase.
-
Step 16Pour the filling into the dishes to about 1/2 inch (1.25cm) from the top, and then brush the exposed pastry with melted butter.
-
Step 17Place in the oven and bake until cooked through, about 50 to 60 minutes.
-
Step 18PLATE/PRESENT
-
Step 19Allow the pumpkin pots to cool for ten minutes, before serving. Enjoy
-
Step 20Keep the faith, and keep cooking.
- Last Step: Don't forget to share! Post a picture of your finished recipe here and on your favorite social network. Don't forget to tag Just A Pinch and include #justapinchrecipes!


Discover More
Category:
Other Appetizers
Tag:
#Quick & Easy
Tag:
#For Kids
Tag:
#Healthy
Tag:
#Heirloom
Diet:
Vegetarian
Diet:
Gluten-Free
Diet:
Low Fat
Diet:
Dairy Free
Diet:
Low Sodium
Diet:
Wheat Free
Diet:
Soy Free
Diet:
Low Carb
Keyword:
#pot
Keyword:
#Yummy
Keyword:
#pumpkin
Keyword:
#autumn
Keyword:
#course
Keyword:
#Fall
Keyword:
#DESERT
Keyword:
#winter
Keyword:
#puree
Keyword:
#first
Keyword:
#Dessert
Keyword:
#pie
Ingredient:
Vegetable
Method:
Bake
Culture:
American
Comment & Reviews
ADVERTISEMENT
Just A Pinch Sweepstakes