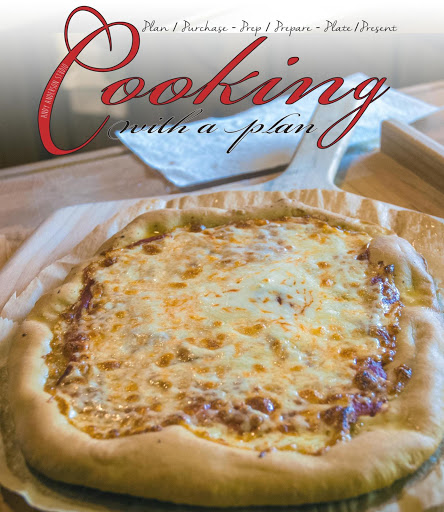
thin & crispy oven baked pizza crust

I love all kinds of pizza, and if you pinched this recipe, I’ll just bet that you do too. To make this work you will need two pieces of equipment: A baking stone (also called a pizza stone), and a way to transfer the pizza in and out of the oven. I would recommend a wooden pizza peel. If you cook a lot of pizzas, these two items are well worth the investment. Pizza Peel: http://www.amazon.com/Norpro-Pizza-Peel-and-Paddle/dp/B0000VLZ2G/ref=pd_sim_k_43?ie=UTF8&refRID=143SZNPZCBBQPK9VGM68 Pizza Stone: http://www.amazon.com/Old-Stone-Oven-4467-14-Inch/dp/B0000E1FDA
prep time
6 Hr
cook time
15 Min
method
Bake
yield
6 -8
Ingredients
- 3 teaspoons sugar, table variety
- 2 teaspoons active dry yeast
- 1 cup filtered water
- 3 tablespoons sweet butter, unsalted, at room temperature
- 1 teaspoon Kosher salt
- 14 ounces all-purpose flour, about 3 cups, plus more for kneading
- olive oil, extra-virgin
- topping for your pie… your choice
How To Make thin & crispy oven baked pizza crust
-
 Step 1Gather all your ingredients and have them at hand.
 -
Step 2Warm the cup of water up to 100f (38c), and stir in the sugar, until completely dissolved, then stir in the yeast and allow it to sit for 10 minutes.
-
Step 3Chef’s Note: As you probably know, this is called “proofing” the yeast. Within 10 minutes, the top of the water should start looking foamy, as the yeast proofs. If it doesn’t get foamy, you need new yeast.
-
Step 4While the yeast is proofing, add the salt and the flour to a large bowl, and stir to combine. And then add the softened butter.
-
Step 5Chef's Note: It's not necessary to mix in the butter; just add it to the bowl.
-
Step 6Slowly add the yeast/sugar water to the bowl, and mix (I use a fork), until you have a nice mass of dough.
-
Step 7Remove the dough from the bowl, and turn out onto a lightly floured surface.
-
Step 8Knead the dough, adding a bit more flour as needed until you have a nice clean elastic ball of dough, about 6 to 8 minutes.
-
Step 9Put some olive oil into a large bowl and spread around the inside surface.
-
Step 10Add the dough ball to the bowl, and turn to coat with the oil.
-
Step 11Cover the bowl with a tea towel, or cling film, and place in a non-drafty part of your kitchen. Allow it to rise until double in size, about two hours… give or take.
-
Step 12At this point, you could make a pizza, but don’t. Punch it down in the bowl, cover the bowl, and allow to rise a second time, until double in size, another two boring hours.
-
Step 13Punch down the dough (the punching part is fun), remove from bowl, and reshape into a ball.
-
Step 14Use a bench scraper, or knife, and cut into two pieces. Or three pieces, if you want a smaller pie.
-
Step 15Chef’s Tip: If you really don’t want to eat two pizzas, you can always freeze the unused portion. Simply rub it with some good olive oil, wrap it tightly with cling film, place in a freezer bag, squeeze out all of the air, and then pop it into the old freezer. If you wrapped it tightly, it should last for up to 3 months. Take it out of the freezer the day before you need it, and place it in the refrigerator to slowly defrost. Let it rest on your countertop for 30 minutes before stretching.
-
Step 16Place a rack in the lower position, and place a pizza stone on the rack. Preheat the oven to 475f (245c), and allow it to heat up for 1 hour before adding the pizza.
-
Step 17Chef’s Tip: A pizza stone is an essential part of making good pies. You could use a baking sheet, but the structure and crispness of the crust would be different. If you like good pizza, invest in a pizza stone.
-
Step 18Lay down a sheet of parchment paper, and using your hands, press the dough ball into a 12-inch circle, for a thin crust, or 10-inches, if you want a slightly thicker crust. All good pizzas are made with your hands… don’t use a roller.
-
Step 19Chef’s Note: The use of parchment paper helps keep everything nice and proper. This way I don’t have to use additional flour, or cornmeal to slide the pizza onto the stone. Once the pizza is stretched out, trim the excess paper with some kitchen shears. The paper will brown a bit, but it won’t impact the taste of the pie.
-
Step 20Use a fork to poke holes in the center area of the dough; leaving about a 1-inch border around the pie, and then let rest for 30 minutes before putting in the oven.
-
Step 21Chef’s Note: Poking a bunch of holes in the dough is a process called, “docking.” It will prevent the dough from forming bubbles during the baking process. By docking the center of the dough, the outer edges will rise and form a nice area for holding in place our toppings.
-
Step 22Use a pizza peel to move the crust to the preheated oven… parchment paper and all.
-
Step 23Allow dough to bake for 5 to 7 minutes, and then remove from the oven. Notice how the outside edges puffed up, but the center didn’t. Mine was in the oven for 6 minutes.
-
Step 24Brush the puffed edges of the crust with your favorite extra virgin olive oil. I have an olive oil that I infused with garlic that’s excellent.
-
Step 25Chef’s Note: This is where I back off… Add your favorite ingredients to the pie. Everyone has their own idea of what they want for toppings.
-
Step 26Pop your tricked out pizza back into the oven for 5 to 7 minutes. Mine was in the oven for 6 minutes
-
Step 27Pull back out, brush a bit more olive oil on the edges, cut into slices and enjoy.
-
Step 28Keep the faith, and keep cooking.
- Last Step: Don't forget to share! Post a picture of your finished recipe here and on your favorite social network. Don't forget to tag Just A Pinch and include #justapinchrecipes!


Comment & Reviews
ADVERTISEMENT
Just A Pinch Sweepstakes