fun essentials: edible/fillable rice bowl

I always like to do fun/different things with food. Last year I was teaching a class in Honolulu… And since, Hawaii is considered Japan’s playground, it is no surprise that the hotels on the water cater to the Japanese. For example, at breakfast you will see mounds of rice, fish heads, and other Japanese favorites; along with the usual American breakfast fare. But I noticed something new… It was a bowl made out of rice, and you could fill with whatever you desired. I decided I needed to make one, and this is what I came up with… So, you ready… Let’s get into the kitchen.
prep time
1 Hr
cook time
15 Min
method
Bake
yield
1 serving(s)
Ingredients
- PLAN/PURCHASE
- 1/2 cup rice, white or brown, your choice
- 3/4 cup chicken stock, not broth, boiling hot
- 1 large farm-fresh egg
- 3 tablespoons parmesan cheese, freshly grated
- 1 tablespoon sweet butter, unsalted, softened
- 2 tablespoons breadcrumbs, unseasoned
- salt, kosher variety, fine grind
- black pepper, freshly ground, to taste
- OPTIONAL ITEMS
- additional spices, to personal taste
- cheddar cheese, freshly grated
How To Make fun essentials: edible/fillable rice bowl
-
 Step 1PREP/PREPARE
 -
Step 2The size and shape of your rice bowl will be determined by the items you have on hand to construct it. I am using a mini springform pan to make mine. That will make it easier to release when it is finished baking. My bowl is a small springform pan 4.5 inches in diameter (11.5cm), by 2 inches tall (5cm). As a matter of fact, I think it would be very difficult to make these without one, so I am going to call a springform pan “essential” equipment.
-
Step 3The items you could fill this with are almost endless. You could add soups and stews. How about a breakfast bowl with scrambled eggs, sausage, and cheese? Stir fries would be excellent. I like to play about with the spices I add to the rice. For example, if I am doing a stir fry, I will add a bit of tamari to the rice before forming the bowl. Have fun and experiment.
-
Step 4Gather your ingredients (mise en place).
-
Step 5Add 1 tablespoon butter to a saucepan with a lid and turn the heat to low.
-
Step 6When the butter melts, add the rice and stir until it begins to turn translucent, about 10 minutes. Do not allow it to brown.
-
Step 7Pour in the boiling chicken stock (you could substitute water), and cover.
-
Step 8Simmer, covered, on low until all the liquid has been absorbed and the rice is nice and tender, about 12 – 15 minutes.
-
Step 9Remove from the pot, spread out in a large bowl or sheet pan, and allow to completely cool, about 20 minutes.
-
Step 10While the rice is cooling coat the inside of the springform pan with the softened butter.
-
Step 11Toss in the breadcrumbs and shake until they evenly cover the bottom and sides of the pan. If you have any extra, just throw away.
-
Step 12Place in the freezer for about 10 minutes.
-
Step 13Place a rack in the middle position and preheat the oven to 425f (220c).
-
Step 14Whisk the egg, then add it and the parmesan cheese to the cooled rice and combine. Then, season with a bit of salt and pepper.
-
Step 15Remove the pan from the freezer and add a thin layer of rice to the bottom.
-
Step 16Using your hands, or a biscuit cutter as a support, build a wall up the sides of the pan, about 1/2 inch thick (1.3cm).
-
Step 17Chef’s Tip: Do not smash it into the pan, but firmly pack it.
-
Step 18Place in the oven, and bake until golden brown, about 20 – 25 minutes.
-
Step 19Allow to rest for about 5 minutes before releasing from the springform pan.
-
Step 20Here is a look at it before filling with yummy stuff.
-
Step 21PLATE/PRESENT
-
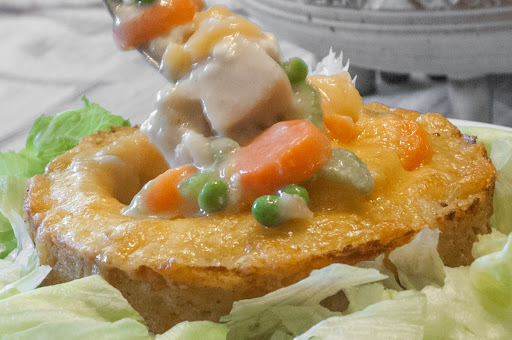
Step 22Fill with whatever suits your tastes. In this example, I filled it with my chicken pot pie filling. Then, I threw some shredded cheddar cheese on top, and stuck it under the broiler, until the cheese was bubbly. Enjoy.
-
Step 23Keep the faith, and keep cooking.
- Last Step: Don't forget to share! Post a picture of your finished recipe here and on your favorite social network. Don't forget to tag Just A Pinch and include #justapinchrecipes!


Discover More
Culture:
Asian
Category:
Rice Sides
Tag:
#Quick & Easy
Ingredient:
Rice/Grains
Diet:
Soy Free
Method:
Bake
Comment & Reviews
ADVERTISEMENT
Just A Pinch Sweepstakes