pizza essentials: the ultimate deep dish crust

My quest for a buttery/crispy crust began, while I was working at Mergellina’s, in Naples, Italy. In the evening, after closing, some us would go to the Vincenzo Pizzeria for a late-night pizza. It was a small place, known mostly to the locals. The good news was that the other cooks at the restaurant I worked at were all locals. Even so, it took them 2 months to warm up to me. They had this butter crust pizza that was absolutely celestial. I am not saying that this is that “exact” recipe, but it is pretty close. So, you ready… Let’s get into the kitchen.
prep time
cook time
25 Min
method
Bake
yield
Several
Ingredients
- PLAN/PURCHASE
- 4 cups flour, all-purpose variety
- 2 teaspoons salt, kosher variety
- 1 teaspoon dried basil
- 1 teaspoon dried oregano
- 1 teaspoon dried parsley
- 1 1/4 cups water, slightly warm
- 3 tablespoons sweet butter, unsalted, melted
- 2 tablespoons olive oil, extra-virgin
- 1 1/2 teaspoons dry yeast, active variety
- ADDITIONAL ITEMS
- additional flour
- additional olive oil, extra virgin
How To Make pizza essentials: the ultimate deep dish crust
-
 Step 1PREP/PREPARE
 -
Step 2For this recipe, I find the best thing to bake it in is a spring form pan with tall sides.
-
Step 3You can work this dough entirely by hand; however, for this recipe, I will be using my stand mixer, fitted with a dough hook. If you are doing this by hand, you will need a large bowl… something you can get your hands into and work the dough.
-
Step 4Gather your Ingredients (mise en place).
-
Step 5Add the flour, salt, basil, oregano, and parsley to the bowl of your stand mixer.
-
Step 6In a measuring cup or bowl add the water, melted butter, olive oil, and yeast.
-
Step 7Give it a quick whisk, to combine the ingredients, and let it stand for about 5 minutes.
-
Step 8What we are doing is “proofing” the yeast. If the top begins to get foamy, you have good yeast; if it does not foam, your yeast is dead, give it a good burial, and buy some better yeast.
-
Step 9Turn the mixer on low, and slowly add the liquid (occasionally stopping to scrape down the sides with a rubber spatula).
-
Step 10Chef’s Tip: I usually reserve a bit of the liquid, just to see if I will need it. Working with flour can be a bit tricky, and things like humidity and other factors can determine how much liquid to use.
-
Step 11When the dough begins climbing up the hook, stop mixing, about 3 – 4 minutes.
-
Step 12Add the dough to a large bowl. Sprinkle on a bit of olive oil then roll the dough until coated in the oil. Cover, and allow to rest in a non-drafty corner of your kitchen for about 30 – 40 minutes.
-
Step 13Remove it from the bowl, dust with a bit of flour, and knead it until smooth and elastic.
-
Step 14Chef’s Note: The dough will be a bit sticky; however, if you keep your hands floured, you should not have a problem.
-
Step 15Place back into the bowl, cover, and allow to rise for about 4 – 5 hours.
-
Step 16Then place the bowl, still covered into the refrigerator for 12 – 24 hours, before using.
-
Step 17On the day that you are going to use it, remove from the fridge, roll out and cut in half.
-
Step 18If you are only making one pie, then wrap the second dough ball up, and stick into the freezer until needed.
-
Step 19Place the dough into a baking pan, coated with some olive oil (spring form is the best).
-
Step 20Slightly flatten it out, and then cover for about 3 – 4 hours.
-
Step 21Chef’s Note: The dough will be about double in size.
-
Step 22Use your fingers, dipped in a bit of oil, to stretch the dough on the bottom, and up the sides of the pan.
-
Step 23Chef’s Tip: If the dough keeps springing back, let it rest for 5 minutes, and continue stretching it until you fill the pan (bottom and sides).
-
Step 24Cover and allow to rest for 2 – 3 hours.
-
Step 25TIME TO BUILD A PIE
-
Step 26To me, the ingredients placed onto your pie are a personal thing, and not to be trifled with.
-
Step 27Place a rack in the middle position, and preheat the oven to 450f (235c).
-
Step 28Chef’s Note: If you have a pizza stone, place that on the rack, and allow it to heat up.
-
Step 29How about lining the pie with some provolone cheese…
-
Step 30Then lay down some nice yummy sauce…
-
Step 31Some Italian sausage would be nice…
-
Step 32Then some grated parmesan cheese…
-
Step 33I think that I will throw on some thinly-sliced prosciutto…
-
Step 34Then some more cheese and some slices of pepperoni…
-
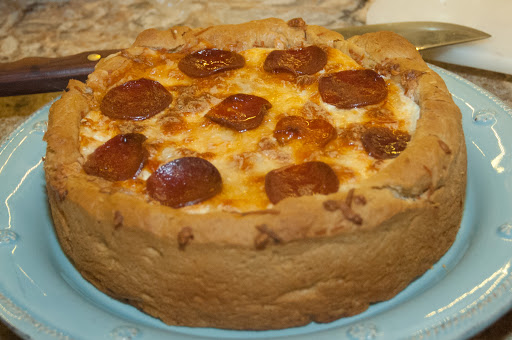
Step 35Stick it in the oven, until the cheese is bubbling and the crust is a golden brown, about 20 - 25 minutes.
-
Step 36Let is rest for about 10 minutes, before removing it from the pan.
-
Step 37PLATE/PRESENT
-
Step 38Cut up into slices and serve while nice and hot. Enjoy.
-
Step 39Keep the faith, and keep cooking.
- Last Step: Don't forget to share! Post a picture of your finished recipe here and on your favorite social network. Don't forget to tag Just A Pinch and include #justapinchrecipes!


Comment & Reviews
ADVERTISEMENT
Just A Pinch Sweepstakes