homemade pastrami

Let’s begin with the right cut of beef, and that would be a brisket from the navel end. The navel end is particularly fatty, and will stand up to the long cooking time. In a sense, we’re taking a brisket, converting it into a corned beef, and then taking that and converting it into pastrami. The process takes days; however, your participation is minimal: Brine, Rub, Smoke, Steam, Eat. So, you ready, let’s get into the kitchen.
prep time
1 Hr
cook time
method
Smoke
yield
6 serving(s)
Ingredients
- 4 pounds 4 pound beef brisket navel end, trim the fat down to about 1/4 inch
- THE BRINE
- 1 gallon filtered water
- 6 cloves garlic, peeled and smashed
- 1/4 cup gin (if you don’t have any gin substitute 5 juniper berries)
- 3 medium fresh bay leaves, torn into pieces
- 3/4 cup salt, kosher variety
- 1/2 cup cup brown sugar, packed
- 2 tablespoons curing salt
- 1 tablespoon whole black peppercorns, smashed
- 6 allspice berries, smashed
- THE RUB
- 3 tablespoons coarsely ground black pepper
- 3 tablespoons coriander seeds
- 1 1/2 tablespoons yellow mustard seeds
- 2 medium dried bay leaves, whole
- 1/4 cup brown sugar, packed
- 2 tablespoons sweet paprika
- 1 tablespoon salt, kosher variety
- 1/2 teaspoon ground cinnamon
- 1/2 teaspoon ground clove
How To Make homemade pastrami
-
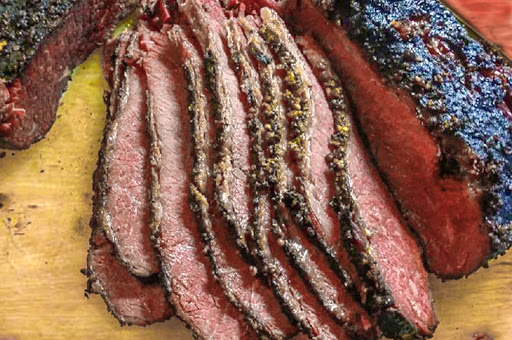
 Step 1Chef's Note: I don't have my usual photos for this recipe... except the main photo, and that speaks for itself. YUM
 -
Step 2In addition, if you already have a good corned beef (from a butcher that you trust) You can skip all the way down to step 15, and save three days. But you really need to trust that butcher, when he/she says they have a good corned beef.
-
Step 3THE BRINE
-
Step 4Put the filtered water into a large non-reactive stockpot and bring to the boil.
-
Step 5Add the brining ingredients.
-
Step 6Chef’s Note: If you are using juniper berries, rub them in your hands to bruise them before adding to the boiling liquid.
-
Step 7Chef’s Tip: If you are using gin, it’s a good idea to have a glass or two… just to make sure it hasn’t gone bad :-).
-
Step 8Stir for about 5 minutes (make sure all the sugars and salts have completely dissolved).
-
Step 9Remove from heat, and allow the brine to cool to room temperature.
-
Step 10Chef’s Note: You will need a non-reactive container to hold the brisket and the liquid… the stockpot will do fine, but make sure that it is a non-reactive stockpot. Personally, I prefer something glass. I don’t like anything plastic, because chemicals can leach out of the plastic over the long soaking time.
-
Step 11Add the brisket to the liquid and immerse it completely in the brine.
-
Step 12Chef’s Note: The brisket will probably float, so use a pie plate or other non-reactive item to weigh it down.
-
Step 13Place in the refrigerator and wait for three days... four or five, if you have the patience.
-
Step 14Chef’s Note: You can check it if you want; however, as long as it’s immersed in the brine, you really don’t have to do anything. Just don’t forget it’s in there.
-
Step 15THE RUB
-
Step 16Add the pepper, coriander seeds, mustard seeds, and the bay leaves to a mortar & pestle, and coarsely grind. Or, you could use a spice grinder.
-
Step 17Add the brown sugar, paprika, salt, cinnamon, and clove, and thoroughly combine.
-
Step 18THE PASTRIMI
-
Step 19Remove the brisket from the brine, rinse, and pat dry.
-
Step 20Thoroughly, cover the brisket with the spice rub
-
Step 21Place the brisket (unwrapped) in the refrigerator for 24 hours.
-
Step 22Chef’s Note: We want the brisket to lose a bit of its moisture before putting it in the smoker, so unwrapped is the way to go. In addition, this will help to keep the rub from falling off.
-
Step 23Remove from the refrigerator.
-
Step 24Allow it to sit out for about an hour, this will take the chill off.
-
Step 25Prepare your smoker, and set the temperature to 220f - 225f (104c – 107c).
-
Step 26Chef’s Tip: Do not be tempted to speed up the process by increasing the temperature… have patience, grasshopper.
-
Step 27Chef’s Note: The choice of wood will help to flavor the meat; however, with all those other flavors banging around, it probably won’t make that big a difference. With that said, I usually use apple wood.
-
Step 28Smoke the brisket, until the internal temperature reaches 190f to 200f (87c to 93c).
-
Step 29Chef’s Note: This process can take up to 12 hours… or more.
-
Step 30Remove from the smoker, cover with a piece of parchment paper, and then tightly wrap in aluminum foil.
-
Step 31Place in the refrigerator for 12 hours, or overnight.
-
Step 32Chef’s Note: Take a couple of bricks and cover them with aluminum foil, and place them on top of the brisket to weigh it down.
-
Step 33STEAM & SERVE
-
Step 34Remove from the fridge and steam the meat for about an hour, or until it reaches an internal temperature of 205f (96c).
-
Step 35Chef’s Tip: It’s important to the tenderizing process to get the meat all the way to 205f (96c).
-
Step 36Chef’s Note: If you don’t own a steamer, you can always put a rack into a pot, with some water (make sure the water is below the rack). Simmer the water, and then put the brisket on the rack, and cover. Make sure the pot doesn’t run dry.
-
Step 37Remove from the steamer, and slice thinly perpendicular to the grain of the meat.
-
Step 38Chef’s Tip: If you cut parallel to the grain, the pastrami will be too chewy. Enjoy.
-
Step 39Keep the faith, and keep cooking.
- Last Step: Don't forget to share! Post a picture of your finished recipe here and on your favorite social network. Don't forget to tag Just A Pinch and include #justapinchrecipes!


Discover More
Category:
Beef
Keyword:
#brisket
Keyword:
#corned-beef
Keyword:
#pastrami
Keyword:
#steam
Ingredient:
Beef
Diet:
Gluten-Free
Diet:
Dairy Free
Diet:
Wheat Free
Diet:
Soy Free
Culture:
Greek
Method:
Smoke
Comment & Reviews
ADVERTISEMENT
Just A Pinch Sweepstakes