asian essentials: awesome pot stickers

I love pot stickers, and the fun thing about them is that you can customize them in a thousand different ways. These are made with chicken; however, you could use pork, shrimp, beef… You could leave the protein out and just go with veggies. Pair these with a couple of good dipping sauces, and you will be the hit of the party. I usually make a hundred or so of these at a time, freeze them, and bring them out when needed. More on freezing them later in the recipe. So, you ready… Let’s get into the kitchen.
prep time
15 Min
cook time
15 Min
method
Stove Top
yield
Several
Ingredients
- PLAN/PURCHASE
- THE FILLING
- 2 1/2 cups napa cabbage, finely chopped
- 1/2 pound chicken, chopped, white, dark or a combination
- 1 tablespoon ginger, freshly grated
- 1 medium carrot, shredded
- 1 medium green onion, chopped, just the white part
- 2 cloves garlic, minced
- 1 tablespoon tamari, or liquid aminos
- 2 teaspoons toasted sesame oil
- 1/2 large egg, beaten
- salt, kosher variety, as needed
- black pepper, to taste
- THE POT STICKERS
- 20 - 30 pot sticker wrappers, more on this later
- grapeseed oil, as needed
- water, as needed
How To Make asian essentials: awesome pot stickers
-
 Step 1PREP/PREPARE
 -
Step 2You will need a large non-stick skillet with a tight-fitting lid. I do not use non-stick pans very often; however, for pot stickers it is almost a necessity.
-
Step 3I usually make my own pot sticker skins… it is actually quite simple; just flour, water, and salt. But, for this recipe, we will use pre-made wrappers. You can find them in any Asian market, and most grocers. My favorite brand is: Gyoza Skins. The skins measure 3.5 inches (9cm) in diameter.
-
Step 4Freezer Trick: These pot stickers can be frozen, and pulled out any time you want some. Go all the way to the final stage of making them, but do not cook them. Instead take a parchment-lined baking sheet, and lay them out. Do not allow them to touch. Then place them into the freezer, for an hour or so, until completely frozen. Place them into a Ziploc bag, in the freezer, until needed. Remove from the freezer, and cook them frozen, according to the instructions in this recipe. Just remember to add an additional minute or two to the cooking time. Easy/Peasy.
-
Step 5Storage Tip: The chances are that you will not use all the pot sticker skins, so you place them in the refrigerator. However, no matter how you seal them up, they always seem to dry out after a few days. Here is what you do. Take the remaining skins, and place them in a Ziploc bag, but before you seal it up and throw it in the fridge, take a paper towel, wet it, and then wring out until just damp, and throw it in the bag with the skins. Now, seal and place in the fridge. They will last for several weeks, and still be nice and fresh.
-
Step 6Gather your ingredients (mise en place).
-
Step 7Finely chopped the cabbage.
-
Step 8Add the chopped cabbage to a strainer, mix in a teaspoon or so, of salt, and let it drain, for about 30 minutes. Then use a tea towel, or paper towels to squeeze as much of the remaining moisture out, and place in a large mixing bowl.
-
Step 9Chop the chicken up, and place in the bowl with the cabbage.
-
Step 10Chef’s Note: Although you can use pre-ground chicken, I think it makes the pot stickers a bit mushy. Manually chopping gives you more control over the final product.
-
Step 11Add all the remaining filling ingredients, and gently mix together with your hands.
-
Step 12Chef’s Note: I usually do not add any additional salt; however, I usually throw in a few generous pinches of pepper.
-
Step 13THE ASSEMBLY
-
Step 14You will need a clean surface for making the pot stickers, and baking sheet, or similar item to hold them before placing in the pan. In addition, you will want to have a damp towel, to place over them, so they do not dry out. Have a small bowl with water, that you can dip your finger into, to wet the skins, and a fork to pinch the skin closed. Let’s do this…
-
Step 15Wet your finger with water, and run it around the edges of the skin, then place a rounded teaspoon of filling in the middle. Do not overfill.
-
Step 16Fold the skin over the filling to make a semi-circle, and then press the tines of the fork on the edges to seal. Repeat for the remaining skins. Do not forget to lay a damp towel over the top of the pot stickers, to keep them from drying out.
-
Step 17Add a tablespoon or so grapeseed oil to a skillet over medium heat, and swirl to lightly coat the bottom. Add the pot stickers to the skillet, but do not overcrowd.
-
Step 18Allow to cook until the bottoms begin to crisp up, about 2 or 3 minutes.
-
Step 19Chef’s Note: You do not need to guess on how crispy they might be, just pick one up and give it a look see.
-
Step 20Once crisp, add about 1/4 cup of water to the skillet, swirl once, then cover, and let steam for an additional 4 – 5 minutes. Then remove the lid, and continue cooking, shaking the pan to loosen the pot stickers, until the remaining water dissipates, about 1 – 2 additional minutes.
-
Step 21PLATE/PRESENT
-
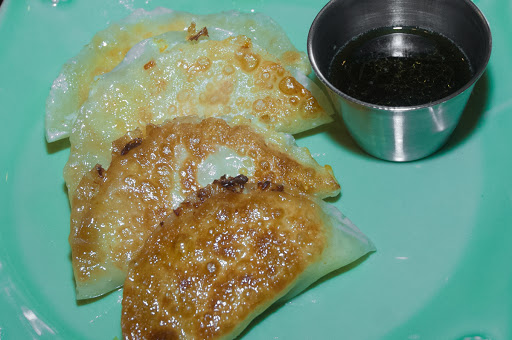
Step 22Flip, and serve crisp side up along with your favorite dipping sauces. Enjoy.
-
Step 23Keep the faith, and keep cooking.
- Last Step: Don't forget to share! Post a picture of your finished recipe here and on your favorite social network. Don't forget to tag Just A Pinch and include #justapinchrecipes!


Comment & Reviews
ADVERTISEMENT
Just A Pinch Sweepstakes