lemonade citrus pound cake

I had no idea how this cake was going to turn out, since I was creating it basically because I had some left over Lemonade Concentrate from another dish I had made earlier & didn't want to waste it. I started with ingredients in my basic POUND CAKE recipe, then had read in one of my vintage cookbooks how cornstarch was used with all purpose flour to create a softer textured cake, & I wanted to implement that into the cake too. Then I thought if I ground up oranges it would enhance the flavors of the lemonade concentrate. This cake is awesome in flavors & taste & so moist in texture. LUV IT
prep time
45 Min
cook time
1 Hr 10 Min
method
Bake
yield
about 16 depending on portion size
Ingredients
- 3 cups White Lily all purpose flour
- 1 cup corn starch
- 3 cups granulated sugar
- 11/2 tablespoons baking powder
- 1 teaspoon Kosher salt
- 3 sticks butter, softened to room temperature
- 6 large eggs, room temperature
- 1/2 cup buttermilk
- 1 cup frozen lemonade concentrate, thawed
- 2 teaspoons pure lemon extract
- 5-6 dashes or drops of yellow food color, optional
- 2 medium whole navel oranges, pulverized in food processor
- 1 box lemon Jello or orange Jello as desired 3 ounces
How To Make lemonade citrus pound cake
-
 Step 1Sift the flour, baking powder, salt and corn starch together in a medium bowl and set aside till needed. Preheat oven to 325 degrees F, prep cake pans by spraying with bakers joy or non-stick cooking spray, if using cooking spray, spray pans heavily then set aside till needed. This is the DIMENSIONS CAKE PAN by NORDIC WARE, it has an 11 cup capacity.
 -
Step 2Cream softened butter in mixer till creamy.
-
Step 3Gradually add in the sugar & lemon gelatin, and beat until blended together and mixture is smooth and no visible granules remain, about 10 minutes.
-
Step 4Add the eggs to butter mixture one at a time, beating well after each has been added.
-
Step 5While butter mixture is beating, cut the 2 oranges into eights, and add to a food processor and process until mixture looks pulverized, similar to this picture.
-
Step 6Measure out lemonade concentrate and buttermilk and set aside till needed.
-
Step 7Once butter mixture is creamy and smooth, gradually add in the sifted flour about 1/3 of flour at a time, and alternate with the lemonade and buttermilk. Beating well before adding more flour. May need to scrape down the sides of bowl during mixing process.
-
Step 8Now add in the pulverized oranges along with lemon extract and yellow food color if desired, and beat just until blended into cake batter. I had 1 cup of pureed oranges.
-
Step 9Divide cake batter evenly between the 2 prepared cake pans or you may use a larger 16 cup capacity cake pan, make sure there is at least 2 inches left in pan to allow for cake to rise during baking. Bake in preheated 325 degree F. oven for 1 hour and 10 minutes or until toothpick inserted in center comes out clean. If using a larger 16 cup capacity cake pan may require additional time about 1 1/2 hours.
-
Step 10This is the Blossoms Cake Pan which has a 10 cup capacity. NOTE: SINCE POSTING THE ORIGINAL RECIPE, I FOUND THAT THE CAKE BATTER FOR THIS RECIPE FILLS MORE THAN A 16 CUP CAPACITY PAN, USE A SMALL LOAF PAN OR A SMALLER ROUND TUBE PAN FOR THE REMAINING BATTER. REMEMBER TO LEAVE 2 inch SPACE from top of pan TO ALLOW CAKE TO RISE.
-
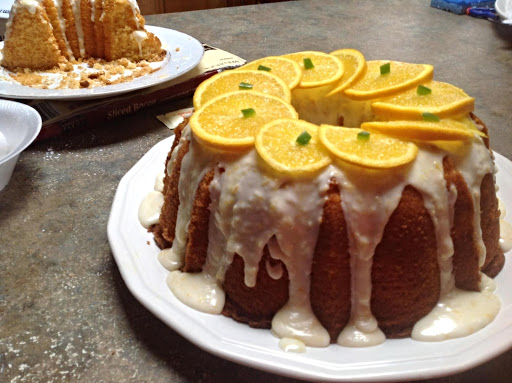
Step 11Try to wait until cake has cooled completely before cutting if you can wait that long. Add a glaze if desired but we enjoyed eating it plain.
-
Step 12This is what the Blossom Lemonade Citrus Pound Cake looked like that I shared with the neighbor.
-
Step 13TO MAKE THIS GLAZE RECIPE: Add 2 cups powdered sugar, 1/2 stick softened butter, 3 tablespoons heavy whipping cream or evaporated milk, 1 teaspoon lemon extract, 1/4-1/3 cup thawed lemonade concentrate, and the zest of a whole orange in a medium size bowl and beat till blended together. Add more liquid for a thinner consistency or more confectioners sugar for a thicker consistency. Then drizzle over cake in desired manner, over entire cake or just drizzled on top and sides.
- Last Step: Don't forget to share! Post a picture of your finished recipe here and on your favorite social network. Don't forget to tag Just A Pinch and include #justapinchrecipes!


Comment & Reviews
ADVERTISEMENT
Just A Pinch Sweepstakes