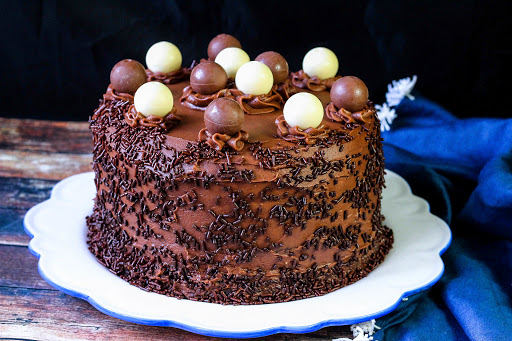
chocolate truffle cake

I made this for my son, James' 14th birthday party and it was a big hit. The idea came from combining several different cake recipes and a little imagination. The cake is super moist but holds its shape beautifully under the rich chocolate silk frosting. Beneath each layer, there are 3, is a layer of rich chocolate ganache. To crown off the top of this beautiful cake, I used Lindt Chocolate Truffles, it is just so sinful and good! Trust me, it is worth the effort. ***Made cake # 2 for my sister's birthday, it was a big hit. She thought I had bought it at a bakery.
Blue Ribbon Recipe
What an insanely good chocolate cake recipe. People will absolutely think you got this from a bakery. The cake is moist and tender, but sturdy enough to hold the frosting and ganache layers. This chocolate frosting is rich and smooth. Where this cake gets special is the chocolate ganache filling. It's rich and chocolaty with a slight orange flavor. The rich Lindt truffles are the perfect topping and make the layer cake extra fancy. This cake will make a special occasion extra special. If you're a beginning baker, we'd suggest having someone help you in the kitchen. There are a lot of steps, but the outcome is the perfect cake for a chocolate lover.
Ingredients
- RICH CHOCOLATE CAKE (3 LAYERS)
- 1 cup cocoa, unsweetened
- 2 cups boiling water
- 1 cup butter or margarine, softened
- 2 1/2 cups sugar
- 4 large eggs, room temperature
- 1 1/2 teaspoons pure vanilla extract
- 2 3/4 cups all-purpose flour
- 2 teaspoons baking soda
- 1/2 teaspoon baking powder *not a typo, just 1/2 tsp.
- 1/2 teaspoon salt
- CHOCOLATE GANACHE FILLING WITH GRAND MARNIER
- 9 ounces semi-sweet chocolate chips
- 1 cup heavy cream
- 1/2 tablespoon Grand Marnier
- 2 teaspoons grated orange zest
- SATINY CHOCOLATE FROSTING
- 6 ounces semi-sweet chocolate chips
- 1/2 cup milk
- 1 cup (2 sticks) butter or margarine
- 2 1/2 cups powdered sugar
- CAKE GARNISH #1
- 1 bag of Lindt truffles, milk chocolate and white chocolate
- 1 large jar of chocolate jimmies/chocolate sprinkles
- CAKE GARNISH #2
- 1 bag M&M's of your choice
- 1 cup creme filled Pirouettes (Pepperidge Farm), 27 oz.
- ribbon
How To Make chocolate truffle cake
-
 Step 1FOR CAKE: Preheat oven to 350 degrees. Grease 3 9-inch layer cake pans (I use Wilton, they are the best). Cut out circles of wax paper and line bottom of pans. If you have Wilton Bake-Even Cake Strips, use them. If not, you will have to level cakes after they are cooled.
 -
Step 2Combine boiling water and cocoa. Stir until smooth. Set aside in the fridge to cool.
-
Step 3Cream butter, sugar, eggs, and vanilla at high speed of an electric mixer until light and fluffy (about 5 min is perfect).
-
Step 4In a separate bowl combine flour, soda, baking powder, and salt.
-
Step 5Alternately add flour.
-
Step 6Then cocoa mixture beginning and ending with flour.
-
Step 7Do not overbeat or cake will be tough!
-
Step 8Pour batter into prepared pans.
-
Step 9Bake at 350 degrees for 25-30 or until top springs back. Do not overbake!
-
Step 10Cool in pans 10 minutes.
-
Step 11Then flip out onto a large plate and put in the freezer. Don't worry, I know what I am doing. This keeps the cakes from falling apart and won't leave crumbs in your icing.
-
Step 12GANACHE FILLING: Place the chocolate into a medium bowl.
-
Step 13Heat the cream in a small saucepan over medium heat. Bring just to a boil. Watch very carefully because if it boils for a few seconds, it will boil out of the pot.
-
Step 14When the cream has come to a boil, pour over the chocolate chips.
-
Step 15Whisk until smooth.
-
Step 16Stir in the Grand Marnier and the orange zest.
-
Step 17Transfer hot chocolate to a relatively deep stainless steel bowl and immerse it into a bowl of ice water. Then whip with a hand mixer until it is thick and fluffy.
-
Step 18Once it is desired consistency, take out of ice bath or it will continue to harden; set aside.
-
Step 19SATINY CHOCOLATE FROSTING: Combine chips, milk, and butter in a LARGE saucepan. Cook over medium heat, stirring constantly, until melted and smooth.
-
Step 20Remove from heat; blend in powdered sugar.
-
Step 21Set the pan (or transfer to a mixing bowl) into an ice bath; beat at medium speed with an electric mixer.
-
Step 22Stop occassionally to scrape down the sides. Mix until frosting is fluffy and holds its shape.
-
Step 23It should make a peak with a spoon and hold it. Remove from ice bath or it will continue to harden!
-
Step 24CAKE ASSEMBLY: Remove frozen layers from the freezer and put on a platter lined with wax paper strips to catch the mess. Place the first cake and spoon about half of the ganache.
-
Step 25Place the next cake on top of the ganache layer.
-
Step 26Spoon the rest of the ganache on top.
-
Step 27Place the last cake on top. Frost the top with the satiny chocolate frosting first. Then start on the sides. Smooth top as much as possible with a flat knife dipped in hot water.
-
Step 28Take your chocolate jimmies (chocolate sprinkles). Gently take your hand and press them into the sides only. Continue until you have gone all he way around. Gently remove the wax paper strips and discard. Put remaining filling into a piping bag and pipe 12 medium size swirls on top of the cake. I used a #21 tip. Space them out before you start piping to make sure you get 12 and they are even. Top each swirl with a Lindt chocolate truffle and a white chocolate truffle, alternating. If the bottom of your cake is messy where you pulled out the paper, you may use the same tip to pipe a border around the base of the cake.
-
Step 29Chill in the refrigerator immediately. Before serving, let the cake set out at room temperature 30 minutes so the chocolate will soften back up slightly. Enjoy!
-
Step 30ALTERNATE GARNISH: Pipe a border around top and bottom lip of cake. Take Pirouette creme filled wafers and line them up around the sides of cake. (They do not have to be all the same height). Add M&M's to the middle of the cake . ***Finished Cake #2 in my photo #2 made in (3) 9-inch pans. Serves at least 14, huge cake.
- Last Step: Don't forget to share! Post a picture of your finished recipe here and on your favorite social network. Don't forget to tag Just A Pinch and include #justapinchrecipes!


