master recipe: caramelizing onions

Nothing can bump up the flavor of a good steak, burger, or just about any sandwich, than a batch of caramelized onions. And let’s not forget all the other ways that we can use these versatile onions. The secret to good caramelized onions is not the onions (you can caramelize just about any old onion). It’s about time and temperature… It’s about low and slow… It’s about patience. Full Stop. So, you ready… Let’s get into the kitchen
prep time
5 Min
cook time
50 Min
method
Stove Top
yield
Several
Ingredients
- PLAN/PURCHASE
- 2 large yellow onions
- 2 tablespoons sweet butter, unsalted
- 1 tablespoon olive oil, extra-virgin
- 1/4 cup white wine, chicken stock, or filtered water
- 1 pinch salt, kosher variety
- 1 tablespoon balsamic vinegar (optional)
How To Make master recipe: caramelizing onions
-
 Step 1PREP/PREPARE
 -
Step 2Gather Your Ingredients.
-
Step 3Add the butter and olive oil to a large sauté pan over medium-low heat.
-
Step 4While the butter is melting, cut the onions, pole-to-pole, remove the skin and thinly slice.
-
Step 5Chef’s Note: Caramelized onions like to have lots of friends, so I would do a minimum of two good-sized onions, or more. If you wind up making more than you need, you can always freeze the leftovers.
-
Step 6Add the onions to the pan, and give them a stir.
-
Step 7Chef's Note: Add a pinch of salt, to get the process started.
-
Step 8Chef's Note: Come back every 8 – 10 minutes, and give them another stir.
-
Step 9After 10 minutes the onions will be soft, but not brown… not a bit of brown. If they are beginning to brown, the heat is set too high… Turn it down.
-
Step 10After 20 minutes, the onions are beginning to lose moisture to the pan, and may begin to brown… but not very much browning. Stir the onions, with a wooden spoon, and incorporate the brown bits beginning to form on the bottom of the pan (fonds), back into the onions.
-
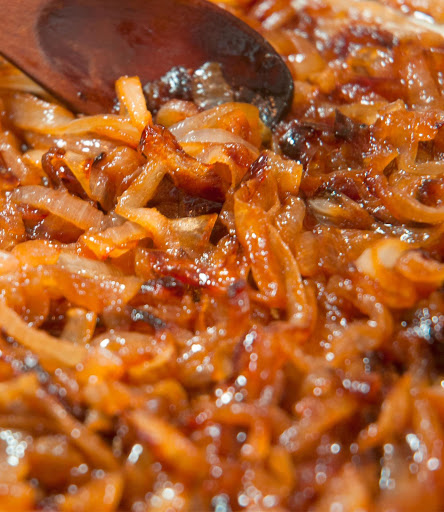
Step 11After 30 minutes, the onions are browning nicely (no burning), and as they begin to caramelize, they’re giving off a wonderful aroma. Keep scraping those fonds into the onions.
-
Step 12After 40 minutes, they should be golden in color, and just about ready for the next step.
-
Step 13Chef’s Note: Depending on the heat of the pan, it might take an additional 15 to 20 minutes to get the color and taste that you desire.
-
Step 14Add the liquid (wine, stock or water), scrape up all those yummy fonds, and incorporate them back into the onions.
-
Step 15Reduce most of the additional liquid, until the onions are nice and creamy, about 5 minutes.
-
Step 16Chef’s Tip: At this point, I sometimes add a bit of balsamic vinegar, for an extra kick. I usually do this if I’m baking these onions into a pizza.
-
Step 17PLATE/PRESENT
-
Step 18Serving Ideas • Use them to grace a burger, or other sandwich. • Mix them in soups or stews. • Add to your favorite Pizza. • Add to the top of a nice soft cheese (brie) and serve with crackers. • Add to the top of a nice pile of pasta.
-
Step 19Chef’s Tip: If you’re not using them right away, you can freeze them, and they will survive for several months. Enjoy.
-
Step 20Keep the faith, and keep cooking.
-
Step 21If you enjoyed this recipe, and would like to be notified when I post more yummy stuff, just click here to follow me: https://www.justapinch.com/my/favorites/add/id/747894
- Last Step: Don't forget to share! Post a picture of your finished recipe here and on your favorite social network. Don't forget to tag Just A Pinch and include #justapinchrecipes!


Discover More
Comment & Reviews
ADVERTISEMENT
Just A Pinch Sweepstakes