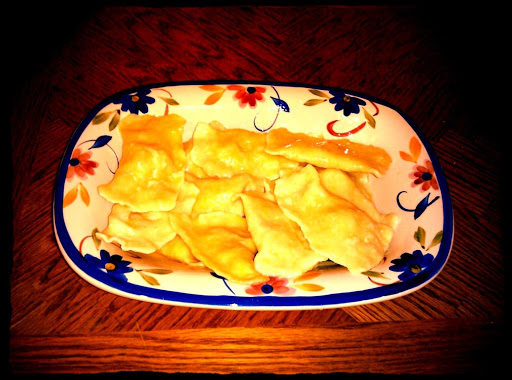
polish potato pierogi (pierogi ruskie)

This is the way my mama taught me! Please don't omit reading my tips for the steps :) The name Ruskie Pierogi (meaning Russian Pierogi), does not mean these are Russian! It is just the way potato pierogi are called. My mom called the sauerkraut pierogi Polskie Pierogi (Polish Pierogi), so these names might just be how she wanted to identify them.
prep time
cook time
15 Min
method
Stove Top
yield
5 -8
Ingredients
- DOUGH
- 2 1/2 cups flour
- 1 teaspoon salt
- 1 egg
- 2 tablespoons sour cream
- 1/2 cup lukewarm water
- POTATO FILLING
- 5-6 russet potatoes
- 1 yellow onion
- 1 cup farmers cheese
- 1/4 cup olive oil, or half stick butter (used for sauteeing onion)
- salt and pepper to taste (tip - use more pepper than you think is necessary!)
- 1 stick salted butter (in mashed potatoes)
- OTHER
- 1-2 stick salted butter (for basting the cooked pierogi)
- 1/4 cup salt (for salted boiling water)
- 12-15 cups water (for boiling pot of water)
How To Make polish potato pierogi (pierogi ruskie)
-
Step 1Make the filling first: Boil potatoes. Saute onions in olive oil or 1/2 stick butter. Mash potatoes with onions, farmers cheese, 1 stick salted butter, and salt and pepper to taste. Don't omit the pepper!
-
Step 2Store potato filling in fridge until well chilled / overnight.
-
Step 3Make the dough: Sift flour and salt together. In large bowl or on floured surface, make a hole in the middle of the flour.
-
Step 4Add egg and sour cream. Work this together with your hands. Pour water in as needed, to make dough moist.
-
Step 5Work this well until dough forms. Your arm may hurt and your fingers may get really sticky, but it is worth it.
-
 Step 6Place dough in plastic bowl and cover with plastic top, or leave on floured work surface and cover with plastic bowl. Let it rest for about 30 minutes in room temp.
 -
Step 7In the meantime, set up your workstation. You will need a large pot of salted water, slotted spoon, 1-2 sticks salted butter in saute pan, baking dish with a cover (for when you remove pierogi from pot), small cup of water, extra flour, sharp knife, rolling pin, and regular spoon for spooning filling, and floured plate for storing your raw pierogi.
-
Step 8After 30 minutes, take out your dough. Begin to boil your pot of salted water.
-
Step 9Slice off some of the dough. On a floured surface, roll dough out into as much of a square as possible. Make the dough about 1 millimeter, to 1 1/2 millimeter thick.
-
Step 10Slice dough sheet into squares (this doesn't have to be perfect size!). TIP: hold dough with two fingers while slicing, to prevent dough from clumping up...see pic!)
-
Step 11Spoon about 1 tablespoon of filling into the middle of square. TIP: Don't have any filling touching the sides. If you do, sides won't hold properly when pinching them together later on.
-
Step 12Dip fingertips into warm water. Slide along the sides of the square. Fold over, and pinch together. TIP: Do this gently and don't tear the dough, and don't let filling slip onto the edge. This will help pierogi not fall apart in cooking.
-
Step 13Place pierogi on floured plate. Repeat steps until you have about 8-10 pierogi ready for the pot. TIP - don't overcrowd pot with too many pierogi because they won't have room to move around and cook properly.
-
Step 14Once you have them ready, and pot of salted water is boiling, drop pierogi into the pot one by one, stirring the water after each drop. TIP: Stir the WATER, trying not to touch the pierogi. You want to babysit this and constantly stir, to prevent pierogi from sticking to pot, and to each other.
-
Step 15Wait for pierogi to float to top. Boil them for 10-12 minutes, stirring water often. TIP - after ten minutes, take one out to test it, meaning cut it open and taste if dough is done.
-
Step 16In the meantime, melt 1-2 sticks of salted butter. Pour some into baking dish you have ready on the side, to collect your done pierogi.
-
Step 17Once done, carefully fish out your pierogi with slotted spoon into buttered baking dish.
-
Step 18Pour butter all over pierogi after each set you make. Slosh them around in the dish so they don't stick together. Keep dish covered whenever you can so they don't dry out.
-
Step 19TIP: If your pierogi break in the water, and your water starts to get dirty from the bits of filling floating around in it, start over with a new pot of boiling salter water.
-
Step 20TIP: When not using your dough, keep covered with plastic to keep it from drying out.
-
Step 21Enjoy!
- Last Step: Don't forget to share! Post a picture of your finished recipe here and on your favorite social network. Don't forget to tag Just A Pinch and include #justapinchrecipes!


Discover More
Category:
Other Main Dishes
Category:
Potatoes
Category:
Other Side Dishes
Keyword:
#polish
Keyword:
#hearty
Keyword:
#traditional
Keyword:
#authentic
Keyword:
#Pierogi
Keyword:
#hierloom
Culture:
Polish
Ingredient:
Potatoes
Method:
Stove Top
Comment & Reviews
ADVERTISEMENT
Just A Pinch Sweepstakes