how to make sugar skulls - step by step

Sugar skulls are a tradition for the Day of the Dead (November 1st) in Mexico. Making the sugar skulls is not difficult if you carefully follow each step. Having the right sugar skull supplies is critical. I've found the best sugar skull supplies at the Reign Trading Company.
prep time
cook time
method
No-Cook or Other
yield
Makes a lot of sugar skulls
Ingredients
- granulated sugar
- meringue powder
- water
- 2 pounds confectioners' sugar
- different bright food coloring paste (can order online, found at crafts and cake supply stores)
- icing decorator bags (can be orded online, found at craft or cake supply stores)
- sugar skull molds (can be found online)
- feathers for decorating
- sugar flowers for decorating
- small colored rhinestones for decorating
- beads for decorating
- sequins for decorating
- different colored foil for decorating
How To Make how to make sugar skulls - step by step
-
 Step 1What you will need to make great sugar skulls: Granulated Sugar (adjust amount depending on how many sugar skulls you will be making. Approximately 1 cup per 6 small sugar skulls, 4 medium or 1 large whole sugar skull.) Large bowl Water Sugar Skull molds (shape and size of your preference. (Some are faces only and some include two parts that you put together to make a whole skull.) Meringue powder, 1 teaspoon for each cup of sugar. (Helps to hold the sugar together.) Powdered sugar for the sugar skull decorative icing. Paste food coloring to color the icing. Icing decorator bags A large, dry area for the sugar skulls to dry in. (Once for the sugar to dry in the mold, and once for the icing to dry.) Any other decoration you like such as sugar flowers, beads, feathers, small rhinestones, sequins, and colored foil
 -
Step 2Prepare the Sugar: For every cup of sugar, mix in 1 teaspoon of meringue powder and sprinkle 1 teaspoon of water on top. Work the water into the sugar with your fingers until the mixture feels like cool beach sand. This takes a few minutes, so be patient. The sugar is ready when you can press your finger or thumb into it and the print will stay.
-
Step 3Making the Skull: Fill the mold with sugar and press firmly with the palm of your hand. When the skull is full and pressed into mold, use the back of a knife to scrape off excess sugar and flatten back. Lightly re-press the scraped surface to smooth it.
-
Step 4Remove Mold and Let the Skulls Dry: Place a piece of cardboard or flat plate over the sugar skull. Hold the skull on the plate tightly and flip it over. Set the plate down and carefully remove the mold. Let the skulls dry for 12-24 hours.
-
Step 5Prepare the Icing: In a large mixer, mix 2/3 cup water, 1/2 cup meringue powder and 2 pounds of powdered sugar until icing peaks or about 9 minutes. Separate the icing into smaller portions (disposable cups and popsicle sticks work well for this) and use the paste food coloring to color the icing. Place the icing in the icing decorator bags. Snip the end of each bag when you're ready to decorate. Start very small with the snip, you can make it bigger if necessary.
-
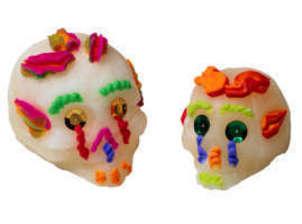
Step 6Decorate the Skulls: Use your icing to decorate the skulls. If you're adding foil, beads or feathers, use the icing as a glue to attach them. If you add non-edible items to the skull, do not attempt to eat it! Note- If you have any larger 2-piece skulls, use the icing to "glue" the pieces together.
-
Step 7Let the Decorated Sugar Skulls Dry: Let the icing dry until it becomes hard. Then you can touch and display them as you like.
-
Step 8Sugar Skull Tips: Meringue powder cannot be omitted. Some people use egg white but with mixed results. Sometimes they do not want to dry. Try to make sugar skulls on a very dry day. If it is too humid outside, they may not dry well. If this happens put them in a warm oven for 2 hours to see if that helps. For the larger skulls, you may scoop out some of the front and back pieces to make the finished skull lighter. Let the skull dry for 2 hours, then scoop out a hole in each one leaving a 1/2 inch solid flat border around the edge to glue them together. The scooping's may be re-used to make more skulls. Lightly spritz sugar with water if sugar gets to dry while working.
- Last Step: Don't forget to share! Post a picture of your finished recipe here and on your favorite social network. Don't forget to tag Just A Pinch and include #justapinchrecipes!


Comment & Reviews
Comments and reviews are disabled on unpublished recipes.
ADVERTISEMENT
Just A Pinch Sweepstakes