(lemon curd) lemon cheese filling and icing

My mother made the best layer cake with the Lemon Curd,filling and icing. I asked her once why she called it lemon cheese as it has no cheese in it. She replied that when you boil it (as it thickens) that it resembles cheese because of the holes that appear while it cooks. She used all yolks -no whites. I like the lightness you get by adding the whites. It is more orangey with just the yolks. This is the best (and pretty easy) Lemon Curd. It not only is delicious between the layers and on top of a cake, but it mades a wonderful filling for a cake roll, served overy berries, etc.
prep time
5 Min
cook time
10 Min
method
---
yield
Ingredients
- 3 large eggs
- 3/4 cup granulated white sugar
- 1/3 cup fresh lemon juice (2-3 lemons) **
- 4 tablespoons unsalted butter, at room temperature
- 1 tablespoon finely shredded lemon zest
How To Make (lemon curd) lemon cheese filling and icing
-
 Step 1In a stainless steel bowl placed over a saucepan of simmering water, whisk together the eggs and sugar until well blended.
 -
Step 2Then add the and lemon juice and blend with the sugar/egg mixture.
-
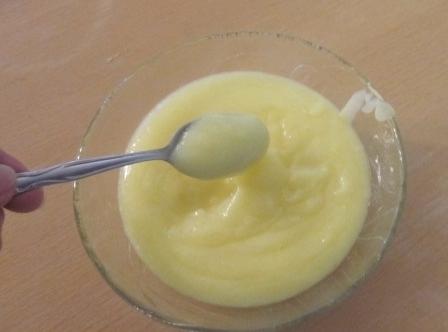
Step 3Cook; stirring constantly (to prevent it from curdling) until the mixture becomes thick. It will be the consistency of sour cream –or as Mama stated, until it looks yellow-orange and has holes like Swiss cheese. This will take approximately 10 minutes.
-
Step 4Remove from heat and immediately pour through a fine strainer to remove any lumps (If you only simmer it and stir constantly, you many not have lumps.).
-
Step 5Cut the butter into small pieces and whisk into the mixture until the butter has melted. Add the lemon zest and let cool. The lemon curd will continue to thicken as it cools.
-
Step 6Cover immediately (so a skin doesn't form). While still warm, spread filling between 4 layers of cake; Pour filling over top of cake and let it go down the sides of cake (Or you can use a different icing from the filling).
-
Step 7Use right away or refrigerate for up to a week. I am having this spooned over some fresh berries tomorrow night. Yummy!!
-
Step 8NOTE 1: ** ALWAYS USE FRESH LEMON JUICE - do not use the bottled lemon juice.NOTE 1:
-
Step 9NOTE 2: I find that removing the stringy white substance (that balances the yolk within the albumin) and whisking the eggs and sugar - BEFORE adding the lemon juice helps to attain a smooth consistency that usually eliminates lumps from forming -no lumps = no straining.
-
Step 10NOTE 3: You can store it in a air-tight jar in the refrigerator for up to 1 week (If you don't want to use it right away.) OR if you are good at canning, you can prepare it in canning jars and have the treat on hand all the time -also makes great gifts!
-
Step 11USING ONLY YOLKS: As I mentioned above, Mother used only yolks -this made for a darker yellowy-orange result. And the "holes" were more visible when cooking. I like it with and without the egg whites -but it is lighter (color and consistency) using both the yolks and whites. If you want to try it with just the yolks, use 6 large yolks.
- Last Step: Don't forget to share! Post a picture of your finished recipe here and on your favorite social network. Don't forget to tag Just A Pinch and include #justapinchrecipes!


Discover More
Comment & Reviews
ADVERTISEMENT
Just A Pinch Sweepstakes