bonnie's spooky witches fingers

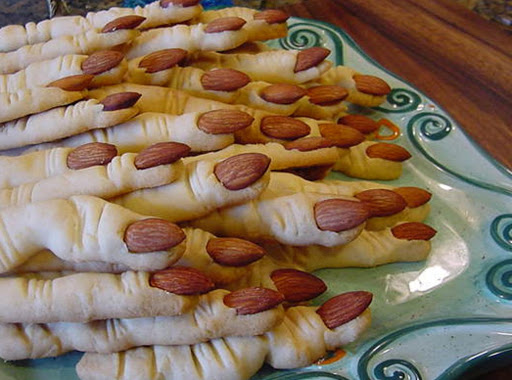
You will enjoy making these Spooky Witches Fingers. How clever is this? These grown-up tasting cookies with a kid appearance are sure to be a smash hit at your next Halloween party! Almonds act as fingernails and red decorating gel as blood for these spooky finger-shaped cookies that kids and grown-ups alike will Enjoy! My Dad loved helping me make these today. He is 92 and has never seen this type of cookie before. He really got into it and wanted me to make a hand with a thumb. So I tried my best. This is fun and easy to do! Enjoy!
prep time
15 Min
cook time
20 Min
method
Bake
yield
60 serving(s)
Ingredients
- 1 cup butter, softened
- 1 cup confectioners' sugar
- 1 egg
- 1 teaspoon almond extract
- 1 teaspoon vanilla extract
- 2 2/3 cups all-purpose flour
- 1 teaspoon baking powder
- 1 teaspoon salt
- 3/4 cup whole almonds
- 1 .75 ounce tube red decorating gel
How To Make bonnie's spooky witches fingers
-
 Step 1Combine the butter, sugar, egg, almond extract, and vanilla extract in a mixing bowl. Beat together with an electric mixer; gradually add the flour, baking powder, and salt, continually beating; refrigerate 20 to 30 minutes. (Don't skip this step.)
 -
Step 2Preheat oven to 325 degrees F (165 degrees C). Lightly grease baking sheets. (I use parchment paper, no need to grease)
-
Step 3Remove dough from refrigerator in small amounts. Scoop 1 heaping teaspoon at a time onto a piece of waxed paper. Use the waxed paper to roll the dough into a thin finger-shaped cookie. Press one almond into one end of each cookie to give the appearance of a long fingernail. Squeeze cookie near the tip and again near the center of each to give the impression of knuckles. You can also cut into the dough with a sharp knife at the same points to help give a more finger-like appearance. Arrange the shaped cookies on the baking sheets.
-
Step 4Bake in the preheated oven until the cookies are slightly golden in color, 20 to 25 minutes.
-
Step 5Remove the almond from the end of each cookie; squeeze a small amount of red decorating gel into the cavity; replace the almond to cause the gel to ooze out around the tip of the cookie. I liked mine natural color.
-
Step 6Cook's Tip: You can add green food coloring to the dough and when you take them out of the oven , you can add a single chocolate chip for a wart. You can add red gel food coloring or raspberry jam for the severed end of the finger. Possibilities are endless! The cookies do enlarge when baked (almost double the thickness) so make sure you don't make them too round when you are rolling them out. My Dad wanted me to make a hand with a thumb, so I gave it my best shot! LOL! This was so much fun! Enjoy!
- Last Step: Don't forget to share! Post a picture of your finished recipe here and on your favorite social network. Don't forget to tag Just A Pinch and include #justapinchrecipes!


Discover More
Category:
Cookies
Tag:
#Quick & Easy
Tag:
#For Kids
Keyword:
#bonnie's
Keyword:
#fingers
Keyword:
#halloween
Keyword:
#witches
Keyword:
#spooky
Keyword:
#halloween fun
Keyword:
#BONNIE'S SPOOKY WITCHES FINGERS
Collection:
Halloween Treats
Method:
Bake
Culture:
American
Ingredient:
Flour
Comment & Reviews
ADVERTISEMENT
Just A Pinch Sweepstakes