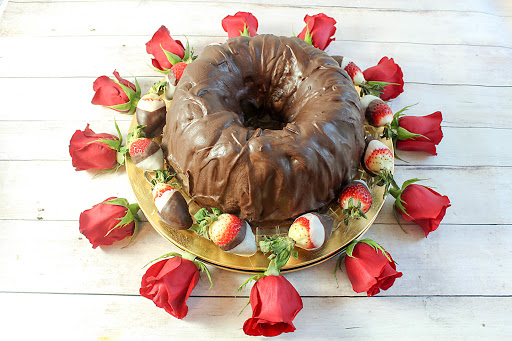
dressed up valentine cake

I love Valentine's Day and all the goodies. Roses, champagne, gifts, cards, chocolate and RED HEARTS that say I LOVE YOU !!! This is my designed Valentine cake. Have fun with it.
Blue Ribbon Recipe
This cake looks impressive, but the cake itself is very simple to prepare. Then you have the fun of dipping strawberries and styling the cake plate for your sweetheart. Your valentine will love this delicious strawberry walnut cake. The smooth chocolate ganache glaze literally melts in your mouth like a truffle. It's a beautiful, unique, and scrumptious Valentine's Day dessert.
prep time
50 Min
cook time
1 Hr 30 Min
method
Bake
yield
10 -12
Ingredients
- 1 box white cake mix
- 1 box strawberry Jell-O, 3 oz
- 3/4 cup vegetable oil
- 4 medium eggs, beaten
- 1 cup walnuts, chopped
- 4 tablespoons all-purpose flour, plus more for coating pan
- 1 package frozen, sliced, sweetened strawberries (thawed), 10 oz.
- ICING / GLAZE
- 16 ounces bitter sweet chocolate
- 1/2 cup unsalted butter
- 1 cup heavy cream
- CHOCOLATE COATED WHOLE STRAWBERRIES
- 24-30 large fresh strawberries with stem and green leaves left on
- 6 ounces white chocolate
- 8 ounces dark chocolate
- DECORATIONS
- 2 gold colored chargers
- 12 red long stem roses
How To Make dressed up valentine cake
-
 Step 1CAKE: Preheat oven to 325 degrees F. Grease and flour 10 inch bundt cake pan.
 -
Step 2Combine cake mix, "dry" Jell-O, vegetable oil, nuts, eggs, flour, and strawberries in large bowl.
-
Step 3Beat with electric mixer on medium speed 4 minutes or until well blended.
-
Step 4Pour batter into bundt pan and bake 55-65 minutes until cake tester is clean from center of cake.
-
Step 5Cool ten minutes before removing from pan.
-
Step 6Have the top of cake facing up. Use strips of parchment paper to keep cake plate clean and remove when icing has set up.
-
Step 7For icing, chop chocolate into fine pieces and place in stainless steel mixing bowl.
-
Step 8Place heavy cream and butter in small sauce pan over medium/ high heat on top of stove. Stir mixture until it is simmering.
-
Step 9Remove from heat and pour butter/cream mixture over chopped chocolate. Stir with a non-stick spatula until fully melted.
-
Step 10Drizzle icing over entire cake.
-
Step 11CHOCOLATE COATED WHOLE STRAWBERRIES: Wash and dry the strawberries. Make sure the berries are fully dried.
-
Step 12Melt white chocolate according to directions. Dip half of the strawberries in white chocolate, holding the stem of strawberries.
-
Step 13Give it a quick twist then shake off excess.
-
Step 14Point to ceiling for a couple of seconds until chocolate adheres.
-
Step 15Place on wax paper, let dry.
-
Step 16Melt dark chocolate according to package directions. Dip strawberries at a 45-degree angle.
-
Step 17Let excess drip off. Place on wax paper to dry.
-
Step 18Can dip a few white chocolate coated strawberries in dark chocolate to stripe coat for added color. Make sure the top 1/3 of strawberry is free from chocolate coating so the red color of strawberry and green stem and leaves are showing.
-
Step 19Leave chocolate coated strawberries on wax paper until cake and chocolate drizzle are completely cooled.
-
Step 20Remove strips of parchment paper placed around edge of cake placed there to catch drips of drizzled icing.
-
Step 21DECORATION: Cut stems of red long stem roses so they will crisscross between the 2 gold chargers and the buds will fully protrude and be exposed in a complete circle between the chargers. Place cake on cake plate and place on top of chargers. You may find it easier to poke the rosebuds between the chargers after the plate with the cake is placed on top. If you do it that way, you will simply trim the stems and poke them in far enough to hold and expose the buds.
-
Step 22Once you have gotten the roses set correctly between the charges under the cake, take the chocolate coated strawberries and place half on top of a cake and half around the bottom of the cake. Mix the colors to dress up the cake. The chocolate coated strawberries, gold chargers, and red roses makes the cake very attractive.
-
Step 23Cut out one slice of cake so the color of cake is exposed to add color.
- Last Step: Don't forget to share! Post a picture of your finished recipe here and on your favorite social network. Don't forget to tag Just A Pinch and include #justapinchrecipes!


Comment & Reviews
ADVERTISEMENT
Just A Pinch Sweepstakes