crispy asian rice squares with sauce variations

These are very popular in Japan, and you can get them from street vendors dotted about the various cities. One day I watched my favorite vendor make them, and this is my version of these tasty treats. Not only do these babies taste awesome, they create a beautiful presentation for your next dinner party. So, you ready… Let’s get into the kitchen.
prep time
20 Min
cook time
15 Min
method
Stove Top
yield
4 serving(s)
Ingredients
- PLAN/PURCHASE
- 1 cup sushi rice
- peanut oil, for cooking
- your favorite sauce (more on that later)
How To Make crispy asian rice squares with sauce variations
-
 Step 1PREP/PREPARE
 -
Step 2Gather your ingredients.
-
Step 3Cook the rice according to package directions.
-
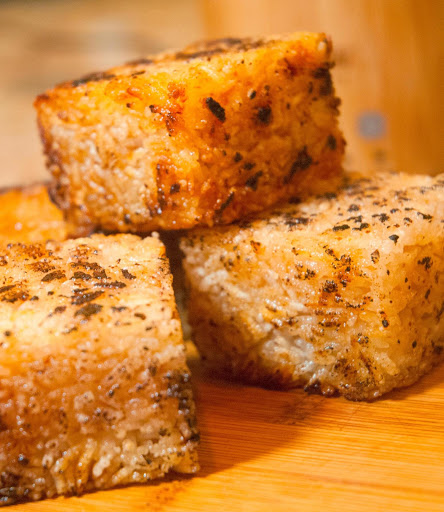
Step 4While the rice is still warm, shape it into squares.
-
Step 5Chef’s Note: I use a square mold to achieve the nice squares. In Japan the most popular shape was a pyramid.
-
Step 6Chef’s Tip: Why sushi rice? Sushi rice is very sticky, and will hold together better than other types of rice.
-
Step 7Add a bit of peanut oil to a skillet over medium-high heat.
-
Step 8Add the rice squares.
-
Step 9Lightly brown them on all six sides, about 90 seconds per side.
-
Step 10Remove from the oil and brush with your favorite sauce.
-
Step 11Sauce: You can use just about anything that you wish for the sauce. • Japanese soy sauce • Oyster sauce • Tamari sauce • Japanese fish sauce • A mixture of tamari and honey (my favorite) • Various jams, like apricot or apple
-
Step 12After brushing with the sauce, return them to the skillet, for a second browning, about 30 seconds per side.
-
Step 13Chef’s Tip: It’s this second browning, that really infuses the flavor into the rice.
-
Step 14ADDITIONAL VARIATION
-
Step 15Instead of just rice, why not put a surprise in the center, like a piece of sesame chicken, or crispy beef…
-
Step 16PLATE/PRESENT
-
Step 17Remove from the skillet, and serve while still nice and warm. Enjoy.
-
Step 18Keep the faith, and keep cooking.
-
Step 19If you enjoyed this recipe, and would like to be notified when I post more yummy food, just click here to follow me: https://www.justapinch.com/my/favorites/add/id/747894
- Last Step: Don't forget to share! Post a picture of your finished recipe here and on your favorite social network. Don't forget to tag Just A Pinch and include #justapinchrecipes!


Discover More
Comment & Reviews
ADVERTISEMENT
Just A Pinch Sweepstakes