chef’s essentials: the science of grilling burgers

As of this writing, the grilling season is going full tilt, and what is more classic than a great-tasting burger on the grill. What I want to talk about is the science of grilling a great burger. These are tips that I have complied from research, and from my own experience working in a few burger joints, and greasy spoons, over the years. So, you ready… Let’s get into the kitchen.
►
yield
serving(s)
prep time
20 Min
cook time
15 Min
method
Grill
Ingredients For chef’s essentials: the science of grilling burgers
-
buns
-
beef
-
toppings
-
good friends for sharing
How To Make chef’s essentials: the science of grilling burgers
-
 1FAT-TO-BEEF RATIO Let’s begin this discussion with fat-to-beef ratio. If you are combining different cuts of beef, look for a combination that will give you 20/80 fat-to-beef ratio. This combination is critical to producing a happy burger. Some grillers suggest a 15/85 ratio, and this might work if you are pan cooking the burgers, but to produce a good juicy burger on a grill, my recommendation is 20/80. Anything less, and the burger will tend to taste a bit dry… Anything more, and it will taste too greasy. The ratio of fat-to-beef on the above-mentioned beef is: • Ground Chuck: 15 - 20% fat • Bottom Round: 10 - 15% fat • Ground Sirloin: 8 - 10% fat When I pick up a chuck roast, I’ll look for one with a bit more marbling, because I want that 20% fat-to-beef ratio.
 -
2WHERE’S THE BEEF? When grilling burgers, it’s essential that you get the correct cut of beef, and since the actual cut, or cuts of beef that you use will be the premier factor influencing flavor and texture of the finished burger, it’s important to get that right. I prefer the more “worked” muscles of the animal. Therefore, sirloin, bottom-round, and chuck would be my first choices. Remember, that since the beef is being ground, toughness of the original cut of beef is not as much a factor, and the three cuts that I mentioned are chock full of flavor. If I could only have one cut of beef, my first choice would be chuck. The fat content is almost spot-on, and it has the deepest flavor of the three mentioned cuts. And, because it’s a less desirable cut for roasts or steaks, it’s usually less expensive than ground-round or sirloin.
-
3COMBINING BEEF CUTS Why settle for just one cut of beef when you can have a ton of fun experimenting with combining different cuts of beef… Well, maybe not a ton, because that would be hard to lift, but it’s pretty dang close. How about combining ground chuck with some short ribs, or maybe brisket. The short ribs will provide richer flavor, and the brisket will give it a bit more chew. Here are some possible beef cut combinations: 1. Chuck/Brisket 2. Chuck/Bottom Round 3. Chuck/Short Ribs
-
4TO GRIND, OR NOT TO GRIND I am a big believer in grinding your own beef, and I can give you several reasons why I choose to do so: 1. It’s just a good, safe thing to do. When you have a hunk of chuck roast, it’s possible that the surface of the roast might contain some bacteria or other nasty things. When you grind it up, the bad stuff gets ground into the meat. So. Instead of having bad stuff on the outside, it’s now everywhere. However, if you grind your own, and you wash the roast off, you’re removing most of the bad stuff before grinding. Are you absolutely sure that your butcher is doing that for you? If you’re doing a lot of grinding (beef, pork, chicken), then it makes great sense to purchase a grinder. If you own a kitchen aid stand mixer, you can get a grinder attachment for under 40.00 USD, and it’s well worth the investment. If you don’t have a kitchen aid, you can get a dedicated grinder for under 70.00 USD. These links give you two choices on Amazon for picking up grinders; however, links can change, so I hope they still work: https://www.amazon.com/s/ref=nb_sb_ss_c_1_16?url=search-alias%3Daps&field-keywords=kitchen+aid+meat+grinder+accessory&sprefix=kitchen+aid+meat%2Caps%2C267&crid=2CDRGASASH11A https://www.amazon.com/dp/B007Y3KLK0/ref=sxr_pa_click_within_right_1?pf_rd_m=ATVPDKIKX0DER&pf_rd_p=3008539542&pf_rd_r=70V1E6THANWK7CD2TG8X&pd_rd_wg=MYRZL&pf_rd_s=desktop-rhs-carousels&pf_rd_t=301&pd_rd_w=HlsGn&pf_rd_i=kitchen+aid+meat+grinder+accessory&pd_rd_r=TEBKYNE17PD43BV46VW1&psc=1
-
51. It will last longer. Studies show that freshly ground beef will last longer than pre-ground beef by up to two days. 2. It makes better grilled burgers. It hasn’t been ground and smooshed into a shrink-wrapped package. Hamburgers made from pre-ground meat will be much denser. Conversely, hamburgers made from freshly-ground beef will have more texture, and mouthfeel. 3. It’s more difficult to combine them with other cuts of beef. Pre-ground, packaged beef has already been smashed, and adding additional meats will only cause you to overwork the mixing process, generating a dense burger… I HATE it when that happens.
-
6WHAT ABOUT MY FOOD PROCESSOR? In my opinion, using a food processor, fitted with an S-blade is your last choice. Most people don’t understand the process of how a grinder works; as opposed to a food processor. In a grinder, a corkscrew pushes the beef towards a slowly spinning blade. The beef is simultaneously cut and pushed through a series of holes set into a steel disk. The size of the holes determines the grind of the beef. A food processor, takes a sharp, fast-spinning, blade, and cuts through the beef like a Samurai warrior. The spinning blade creates a lot of friction, and friction generates heat. Plus, as the blade is spinning, it slices through the beef and fat and smears them together. For a good burger you want the fat and the beef to be separate, and a food processor just won’t do the job.
-
7HOW ABOUT THE BUTCHER? This is a good alternative, only if you have complete confidence in the butcher. 1. Do you know if they are properly cleaning their grinder between grinding other types of meat, pork, or chicken? I don’t want any cross-contamination. 2. Do you know if they are rinsing the beef off before grinding? If they’re not, you’re going to have the same problem of grinding the bacteria into the meat. If you really know your butcher, this would be an excellent alternative to grinding it yourself.
-
8HOW FINE SHOULD I GRIND? If you have your own grinder it will come with two or more grinding plates (that’s the disk with all the little holes in it). I’ve discovered that the grind of the beef will be determined by the cooking method. • Grilling Burgers: When grilling, it is best to use a finer grind, because it will help to hold in more of the fat and moisture. Remember, when grilling, some of the juices will fall through the grate, and we want to minimize that as much as possible • Pan-Frying Burgers: When pan-frying a burger, a coarser grind is called for because the burgers are cooking in their own fat.
-
9PERFORMING THE GRIND To keep the fat and beef as separated as possible, cut it into 1-inch (2.5cm) cubes, and stick them in the freezer for about 15 minutes. In addition, take the grinder attachment and stick it in the freezer with the beef. The beef is cold; the grinder is cold… When the beef is ground, it will separate into wonderful separate bits of fat and beef. In addition, if you are combining different cuts of beef, then grind them at the same time. Cut both types of beef into cubes, combine them together, then freeze for a bit, and grind. The goal is to handle the beef as little as possible. By grinding them at the same time, it saves you the extra step of combining them later.
-
10BOTTOM LINE There are many things that go into the construction of a burger. In my opinion, grinding your own beef can make the difference between a good burger, and a great burger. You have complete control of the process; including the grinding of different types of beef. Freshly-ground beef provides a looser structure that holds moisture, and provides a satisfying mouth texture. Finally, grinding your own beef insures that you are not grinding up surface bacteria with the beef.
-
11SEASONING THE GROUND BEEF A lot of us like to spice things up a bit by adding some seasoning to the beef, before cooking, some of the seasoning I’ve used over the years are: • Freshly Ground Black Pepper • Freshly Ground White Pepper (for some sweet heat) • Chili Powder • Chipotle Powder • Cumin • Mustard Powder • Cinnamon You can try various combinations, depending on the tastes that you going for; however, don’t over season the beef. A burger with just a hint of spice is good… A burger that’s overpowered with spices is not. And this holds true of the toppings, but we’ll talk about that later.
-
12SEASONING TRICK When seasoning the beef, try this trick. Cut the beef up, and then toss with the spices before putting the beef in the freezer. When you grind the beef, the spices will be perfectly ground into the mixture. That way you’re combining the spices at the same time the beef is being ground.
-
13ROOKIE MISTAKE You will notice that I left out one very important spice from my list: salt. Mixing salt in with the ground beef is one of the biggest rookie mistakes you can make. To be honest with you, that is the way I was taught. My dad would fire up the grill on a beautiful Summer weekend day, and haul out a couple of pounds of ground beef. He would then proceed to grab a handful of beef, sprinkle it with salt and pepper, mush it all together, and throw it on the grill… The reason you don’t add salt is that salt draws water out of meat and begins to dissolve proteins. This makes the proteins cling together and become springy. If you are making sausage, then add salt, If you want a tasty, juicy burger, don’t add salt to the ground beef.
-
14ADDITIONAL SPICES To be sure, you can add salt to the burger… but the salt should be added to the burger, just before cooking. I like to add a bit of salt and pepper to the outside of the beef, so I’ll bring those spices out to the grill. I add a bit of salt and pepper to one side, and put it on the grill, then I’ll add salt & pepper to the other side, just before I flip it.
-
15WHY RED BEEF TURNS GREY Pre-packaged ground beef is usually bright red in color, which is the result of oxygen in the air reacting with the meat pigments. However, when you break into that ground beef, the interior is sometimes grey. That’s because the pre-packaged meat has been sitting on the shelf for a bit of time, and the interior is insulated from the oxygen. If you want to know the name of the pigment it's: Oxymyoglobin. But the question is: Is it safe to eat? The answer is yes; however, the beef is probably on its last legs, and should be consumed as soon as possible.
-
16SAFETY TIP Because beef that is turning grey has been in the fridge for a longer period of time, there is a greater possibility that it might contain bacteria; therefore, grey beef should always be cooked well done.
-
17FOLLOW YOUR NOSE Red beef, grey beef… It doesn’t matter. Follow your nose, if the beef begins to smell a bit funky, toss it. It’s not worth getting sick.
-
18SHOULD I LET MY BURGERS REST BEFORE COOKING? No, No, No… There are occasions when we will allow a roast to rest on the countertop before placing into a slow-cooker, or into the oven, but not ground beef. When you put your burgers out to rest, you are just ringing the dinner bell for bacteria. I know some chefs that will bring their burgers out early, and let them sit outside for a bit before cooking. When I asked them why they were doing that, they responded by saying that’s what I was taught to do? Well, not in any school that I ever attended. Keep them nice and cool in the fridge, and when you’re ready to grill or pan fry, take them out and cook them. And, if you want one, here’s another reason to keep them cold. When the beef hits the hot pan or grill, the coolness will insulate the interior of beef, and slow the cooking process. That way I can get a nice crisp outside while still having a juicy interior.
-
19MAKING THE PATTIES The first rule in making the burgers is to handle the beef as little as you can. The more you handle the beef, the tougher the finished product will be.
-
20WEIGHT If you are making a standard burger, using prepackaged hamburger buns, then around 6 ounces (170g) is a pretty good place to start.
-
21FORMING Since there will be some shrinkage during the cooking process, form the beef into a patty, slightly larger than the bun size, and use your thumb to make an indentation in the middle of the patty. As the burger cooks, and begins to shrink, the indentation will begin filling in, and prevent the burger from “doming.”
-
22BUNS Standard hamburger buns run about 4 inches (10cm), and weigh about 1.5 ounces (40g). You want a sturdy bun that will hold up to those nice juicy burgers, so I would recommend a potato bun, or a buttery brioche.
-
23TO TOAST OR NOT TO TOAST When it comes to toasting the bun, the answer is yes. A nicely toasted bun totally compliments those juicy burgers, so toast away. And save the butter-toasting for another day; just get some grill marks on those bad boys.
-
24KEEP THEM COOL After forming the patties, return them to the fridge until ready to cook.
-
25LONG-TERM STORAGE These burgers can be frozen for 4 – 6 weeks, and then defrosted in the refrigerator when ready to use.
-
26PREPPING THE GRILL Your grill should be clean, and it should be at the right temperature. If the grill is too hot, you will burn the outside of the burger, before the inside is cooked; if it’s too cold they won’t release from the grill, and they will most likely turn out dry. Before heating up the grill, hit the grate with a wire brush to knock off any leftover burned bits from the last BBQ session. When I grill burgers, I use a 2-zone system. One side of the grill is screaming hot, and the other half is lower in temperature. If you are using coals, one side will have more coals than the other, if you are using gas, turn the burners down on one side. The hot side of the grill should be around 450f (230c), and the cooler side should be around 300f (150c). To test this out, if you hold your hand over the hot side, you should only be able to keep it there for around 1 second. The cooler side does not have to be so exact; it should be hot, but not screaming hot. Once the grill is hot, wad up a paper towel, dip it in some veggie oil, and run it over the grate. You might get a flair up from the dripping oil, but that’s okay; it will go away. You now have a stick-free grate.
-
27COOKING THE BURGERS You want the indented side of the burger to be on top, so flip to the other side, season with salt & pepper (if using) and then place the seasoned side on the hot grill. Lay the burgers on the hot side of the grill, and allow them to cook, undisturbed, for 2 minutes. Then season the top side with salt & pepper, flip the burgers, and cook an additional 2 minutes. Move them over to the cooler side, and continue cooking: • 2 – 3 minutes for medium rare • 3 – 4 minutes for medium • 5 – 6 minutes for well done
-
28LEAVE THE BURGERS ALONE Never ever use your spatula to press down on the burgers. That’s another rookie mistake. All you are doing is pushing the juices out of the burger, and dropping them onto the hot coals…. Leave them alone.
-
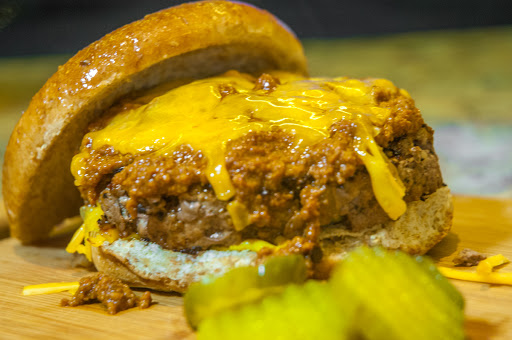
29WHAT ABOUT THE CHEESE It’s all in the timing. Most people put the cheese on too soon, and it winds up dripping off the burgers and onto the hot coals… What a waste of good cheese. Add the cheese in the last minute of cooking.
-
30SHOULD I COVER THE GRILL WHILE THE BURGERS ARE COOKING? In most case, the answer to that question is no. When you cover your grill, you are essentially turning it into an oven… Are you baking these burgers, or are you grilling them? Burgers are best grilled with the majority of the heat coming from the bottom. When you cover the grill, you are surrounding them with heat. The results of a covered grill will be dryer burgers. I HATE it when that happens.
-
31TOPPING THE BURGERS I usually create a toppings bar, and let my guests decide what they want; however, I prefer classic toppings, like lettuce, a slice of beefsteak tomato, onions, and mustard. I’m not a big fan of ketchup on a burger because I think its sweet taste doesn’t compliment the savory flavor of the burger. Just give me that clean, classic burger taste, and leave the fried eggs, avocado, and other fancy toppings for another day.
-
32SERVING SUGGESTION Serve as soon as they are cooked. The longer they sit around, the dryer they will become. This is not a steak, or roast that needs to rest. Use the 1,2,3 method: Off the grill, on the bun, in the mouth… It’s as simple as 1,2,3.
-
33Well, that’s about it… there is a ton of more information on grilling, but this is enough for now. Keep the faith, and keep cooking.
- Last Step: Don't forget to share! Make all your friends drool by posting a picture of your finished recipe on your favorite social network. And don't forget to tag Just A Pinch and include #justapinchrecipes so we can see it too!


Categories & Tags for Chef’s Essentials: The Science of Grilling Burgers:
ADVERTISEMENT
ADVERTISEMENT