wall-e birthday cake
(1 rating)
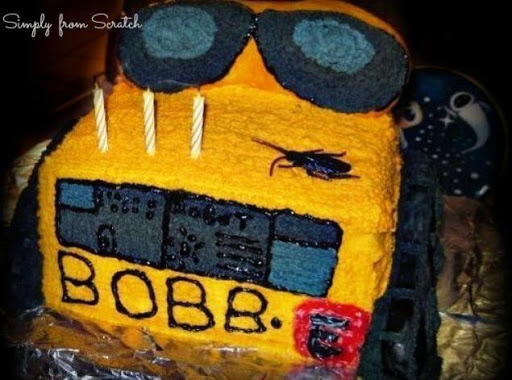

When my son was 3 years old, he was obsessed with the Disney movie Wall-e. A solo robot on earth trying to clean up the planet, all on his own,never complaining and doing his job. Anyways....my little man Loved this character , so I decided to make his birthday cake, and was a lot more work than I thought it was going to be, but his face on his birthday was PRICELESS!!! And that's all that matters to me, that my children are happy and healthy. So If you have a Wall-e fan out there, come and check this cake out, you don't want to miss it :) Enjoy
►
(1 rating)
yield
35 people
cook time
35 Min
method
Bake
Ingredients For wall-e birthday cake
- CAKE
-
4 boxof cake mix of your choice and flavor of your choice
- FOLLOW EXACT BAKING DIRECTIONS BAKE IN A 9X9 PAN
- BUTTER CREAM
-
1/2 csolid vegetable shortening
-
1/2 c(1 stick) butter softened
-
4 csifted confectioners' sugar
-
1 tspvanilla extract
-
2 Tbspmilk (of your choice)
-
yellow food coloring
-
black food coloring
-
grey food coloring (just add black, just alittle at a time, so it gets the color you like
-
red food coloring gel pen (sold in the baking isle)
- TOOLS NEEDED FOR ASSEMBLY
-
4-6wooden cake rods
-
1 boxpre-made fondant (at micheals)
-
1 boxrice crispy treats all ready made, (stronger hold than homemade) for the eyes and wheels)
-
1plastic cockroach
How To Make wall-e birthday cake
-
 1pre-heat oven to 350* Mix cakes mixes one at a time and pre-pare according to package directions. ***Grease pans with cake oil sold at Michaels****** HELPED ME ALOT remove from oven and set cool at room temp. bake in a 9x9 pan for the closest square shape
 -
2Once all cakes have been cooked and cooled. Mix together your butter cream frosting
-
3Instructions: step 1 In large bowl, cream shortening and butter with electric mixer. Add vanilla. Gradually add sugar, one cup at a time, beating well on medium speed. Scrape sides and bottom of bowl often. When all sugar has been mixed in, icing will appear dry. Add milk and beat at medium speed until light and fluffy. Keep bowl covered with a damp cloth until ready to use. step 2 For best results, keep icing bowl in refrigerator when not in use. Refrigerated in an airtight container, this icing can be stored 2 weeks. Rewhip before using Separate frosting into three bowls, you will need MORE yellow than any other color, grey second largest amount, and finally black, but not alot of it.
-
4Place the first layer of cake down onto a foiled pan (cookie sheet and cover with tin foil) or go to Michaels and buy a cake card board. take your cakes and layer them onto of each other(in between layering cakes, spread butter cream frosting in between each layer to help hold cake in place. then once you have achieved a perfect square (like a small box) cover the remaining cake in butter cream and place in fridge to harden.
-
5while cake is chilling, take your rice crispy treats and shape and mold them into large eyes and side bobcat style wheels for the side. cover them with fondant, ONLY if you are sure they are the side and thickness you want for your cake, before placing fondant over them. Place in fridge to harden( easier to place on cake if strong and hard THEN TAKE A NIGHT CAP!!!!!!! GET TO THE REST IN THE MORNING :)
-
6Next day!!!!!!!!!!! remove cake from fridge and eyes and wheels, get your wooden cake rods and a pair of strong snipers ready to stick the eyes and wheels on.
-
7do the wheels first, I used two rods to place through the side of the rice crispy treat into the cake, on both sides of the cake.(MAY TAKE MORE RODS,BUT TRY AND STICK TO TWO) THEN for the eyes, TRICKY, (get help for this step) hold the eyes at an angle and slide the rods downward so the weight of the eyes is toward the center of the cake and not weighing down the back of the cake, which may cause your cake to collapse! :( Once those are secure, place back in the fridge to cool stiff again, while cake is cooling, mix your food coloring into your frostings,
-
8top him off with his best buddy the cockroach add some candles and Enjoy a home made wall-e cake!! Hope you like it, its worth the time and energy if your kids really like something :) My sons name is Bobby, so I thought it would be cuter if I wrote out Bobb-e instead of Wall-e
- Last Step: Don't forget to share! Make all your friends drool by posting a picture of your finished recipe on your favorite social network. And don't forget to tag Just A Pinch and include #justapinchrecipes so we can see it too!


Categories & Tags for Wall-e Birthday Cake:
ADVERTISEMENT
ADVERTISEMENT