graduation penguin cupcakes
(1 rating)
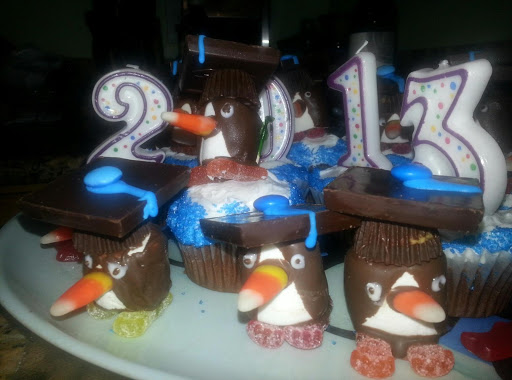
These are a bit time consuming to assemble everything, but it's all store bought. If you have time to sit at the table and play with candy, these are a lot of fun to present!
►
(1 rating)
yield
24 serving(s)
prep time
6 Hr
cook time
30 Min
method
Bake
Ingredients For graduation penguin cupcakes
- CUPCAKES
-
1 boxcake mix, and any ingredients called for in it (eggs, oil and water usually)
-
1 pkgDuncan Hines white frosting (the mix in flavor size is just perfect for 24 cupcakes and you don't need a flavor mix in unless you want flavored frosting)
-
1 bottlecolored sugar for icing the edges of the cupcake (I used the color of the graduating class, so you can customize to your own graduate)
-
24paper cupcake liners
- PENGUINS
-
1 pkgmarshmallows (I found the generic were not as well shaped as a name brand and it made a difference)
-
1 pkgcandy quick chocolate
-
1 pkgcandy quick white chocolate
-
plain toothpicks (don't use colored toothpicks as the dye can bleed)
-
24pieces of candy corn
-
48Sour Patch Kids - need to pair up pieces into matching colors (either 2 small bags or 1 large bag)
-
styrofoam block
- GRADUATION CAPS
-
24mini peanut butter cups (dark chocolate is better)
-
24squares of Ghiradelli dark chocolate squares (10 per bag, had to buy 3 bags)
-
1 tubewriting icing in a color to match your school colors and colored sugar (do not get gel tubes)
-
1 bagM&M's (no nuts, just regular, plain M&M's)
How To Make graduation penguin cupcakes
-
 1Penguin Bodies: Select 24 marshmallows for your penguin bodies. Try to choose even, straight marshmallows. You are going to be dipping these in chocolate and then refrigerating to cool. Melt candy quick dark chocolate according to package directions (1 min in microwave, stir, then 15 second additional if needed). I found this better to do in a larger size ramekin rather than the candy quick package because you need enough depth to dip the marshmallows. Put a marshmallow on a toothpick. Then dip at an angle in the chocolate, then turn the other way and dip the other side so that you wind up with a V shape on the front of the marshmallow. Then dip the back to cover it. Stand the penguin body in styrofoam and keep adding more penguin bodies so they don't touch when standing on the toothpicks. When it is full, place it in the refrigerator to harden. I did not have styrofoam, so I "made do" with something I had in the house and had to do this in batches of 6. While you are doing this step, if the chocolate starts to stiffen up, just zap it for another 15 seconds and stir and it will be fine. You may need to top up the level a bit if the level of the chocolate gets too low. It's important to do the penguin bodies FIRST so you have more depth in the bowl for the dipping.
 -
2Set up candies in a series of bowls (or I have an over-sized 1/4 cup-sized ice cube tray that I found was ideal for this) and sort out your candies to be ready for easy assembly: candy corn, and then sort the Sour Patch Kids into separate containers by colors (It makes it easier to give your penguins matching feet), pull out the color of M&M's that you have chosen for your graduation cap buttons (if they don't have your school color then use a brown one to match the color of the cap). Open 24 of the Ghiradelli squares and place them in a stack to the side. Open your peanut butter cups (if you see peanut butter showing through you can dab some of your candy quick chocolate on it with a toothpick).
-
3Graduation caps: On a large tray put the 24 of the peanut butter cups wide side down. With a butter knife dab a small bit of chocolate on the top, and then center one of the Ghiradelli squares on the top.
-
4When all 24 are affixed, then you can pipe on the "tassle" with the icing of your choice. I liked putting the point of the "cap" to the front of the penguin, so I put the "tassle" on by dabbing at the middle and drawing a line just to the right of the point that would be in the front. I let it dangle a little over the edge so that a drip would go down and dry just a bit below the edge of the chocolate (ideally lol). While it is still wet, put your M&M (M side down) on the icing in the center to form your cap button. When you are done with these let them set to firm up and turn back to the penguin bodies.
-
5Back to Penguin Bodies: Melt 1 square of the white chocolate according to package instructions in a small ramekin. Dip the fat end of a piece of your candy corn in the chocolate and affix it to the penguin face in the white area below the top of the inverted "V". I decided halfway through that it was better to angle the corn vertical rather than horizontal, it looks more penguin-like to me. :-) You will need to hold each one in place for just a moment while the chocolate sets. Using a toothpick, dip it in the white chocolate and put chocolate eyes on either side of the nose. Lay the penguin on its back with the nose up so the chocolate has time to set and the nose won't drop off. When you are at the end of the 24, then go back to your dark chocolate and dip the tip of a toothpick in the chocolate and do a small touch to the center of the white chocolate eyes to put a pupil on the eye.
-
6Final assembly of the penguins: I laid out the Sour Patch kids in pairings of feet with the wide ends out. Zap your dark chocolate again if necessary. Slide the marshmallows off of the toothpicks at this point. Dip the bottom of the penguin body in the chocolate and then center it over the Sour Patch Kids candies so the wider ends stick out as the penguin's feet. When you have these all sitting on the feet, take a butter knife and spread a small dab of dark chocolate on top of the marshmallow to use as glue to affix the graduation caps (move back to the first one you did, as this chocolate will be more set). At this point I let these set up in the refrigerator overnight and made the cupcakes the next morning and continued from there. You can do these the same day, but I wanted to give these some good time to set in the refrigerator first so they firm up nicely before you put them on the cupcakes.
-
7Bake the cake according to package directions, let cool and frost with white icing.
-
8Roll the edges of the icing in the colored sugar sprinkles.
-
9These will be top-heavy cupcakes, so I found that the best way to finalize these was to put a toothpick back into the penguin, threading it in between the two feet and then standing it on the cupcake with the help of the toothpick. A few of them still wanted to lean (I figured they were drinking before graduation), so I added an additional toothpick prop on the side they were leaning towards.
- Last Step: Don't forget to share! Make all your friends drool by posting a picture of your finished recipe on your favorite social network. And don't forget to tag Just A Pinch and include #justapinchrecipes so we can see it too!


Categories & Tags for Graduation Penguin Cupcakes:
ADVERTISEMENT
ADVERTISEMENT